2. Quick Start
You can quickly deploy one infraSIM virtual compute node on VirtualBox. There’s one demonstration version virtual compute node provided as on VirtualBox vagrant-box file and placed at InfraSIM Vagrant boxes. “vagrant init” command will search “infrasim/vnode” box file in your local repository first. You can always build virtual node with latest source code with method described in VirtualBox Box.
2.1. Deploy one virtual compute node
We use vagrant to create the Virtualbox-based VM. Using vagrant, you can quickly create the Virtualbox-based VM on your laptop, work PC whatever your system is MacOS, Linux or even Windows.
Notice: We will assume that you have basic knowledge about how vagrant works, and vagrant version should > 1.8
Deploy Steps
Install necessary packages:
# sudo apt-get install virtualboxInitialize your vagrant directory:
# cd ~/
# mkdir vnode
# vagrant init infrasim/vnode
Turn on virtual compute node:
# vagrant up
Notice: Because VirtualBox as of now doesn’t support Nested Virtualization: VT-in-VT feature, running Qemu inside VirtualBox can’t enable KVM acceleration, which suffers a big performance penalty.
Check Virtual Machine Status after deployment
Check vBMC status using ipmitool on host machine.:
#sudo apt-get install ipmitool
#ipmitool -I lanplus -U admin -P admin -H <vm ip address> sdr list
You can get the command result like the following
Pwr Unit Status  | Not Readable      | ns
IPMI Watchdog    | Not Readable      | ns
FP NMI Diag Int  | Not Readable      | ns
SMI TimeOut      | Not Readable      | ns
System Event Log | Not Readable      | ns
System Event     | Not Readable      | ns
Button           | Not Readable      | ns
PCH Therm Trip   | Not Readable      | ns
BMC Board TEMP   | 41 degrees C      | ok
Front Panel Temp | 30 degrees C      | ok
Board Inlet TEMP | 29 degrees C      | ok
Sys Fan 2        | 7138 RPM          | ok
Sys Fan 1        | 7310 RPM          | ok
Sys Fan 3        | 7138 RPM          | ok
PS1 Status       | Not Readable      | ns
PS1 Power In     | 44 Watts          | ok
PS1 Temperature  | 35 degrees C      | ok
P1 Status        | Not Readable      | ns
P1 Therm Margin  | disabled          | ns
P1 Therm Ctrl %  | 0 percent         | ok
P1 ERR2 TimeOut  | Not Readable      | ns
CATERR           | Not Readable      | ns
MSID Misatch     | Not Readable      | ns
CPU Missing      | Not Readable      | ns
P1 VRD Hot       | Not Readable      | ns
Mem P1 Thrm Mrgn | -46 degrees C     | ok
Mem P1 Thrm Trip | Not Readable      | ns
BB +12.0V        | 11.67 Volts       | ok
BB +5.0V         | 0.03 Volts        | ok
BB +3.3V         | 3.24 Volts        | ok
BB +5.0V STBY    | 4.92 Volts        | ok
BB +3.3V AUX     | 3.25 Volts        | ok
BB P1 Vcc        | 0.94 Volts        | ok
BB +1.5V P1 MEM  | 1.50 Volts        | ok
BB +3V Vbat      | 3.21 Volts        | ok
BB P1 Vccp       | 1.03 Volts        | ok
BB P1 VccUSA     | 0.91 Volts        | ok
BB +1.05V PCH    | 1.04 Volts        | ok
BB +1.05V AUX    | 1.03 Volts        | ok
BB +12.0V V1     | 11.73 Volts       | ok
BB +1.5V AUX     | 1.47 Volts        | ok
HSBP Temp        | 35 degrees C      | ok
HDD 0 Status     | Not Readable      | ns
HDD 1 Status     | Not Readable      | ns
HDD 2 Status     | Not Readable      | ns
HDD 3 Status     | Not Readable      | ns
Refer to Access vBMC Data for accessing and manipulating sensor data and injecting error data.
- Check serial console
In vagrant file, we configure the ssh account as “root”, which means we use password auth method for SSH connection.
# vagrant sshType the password: “root”
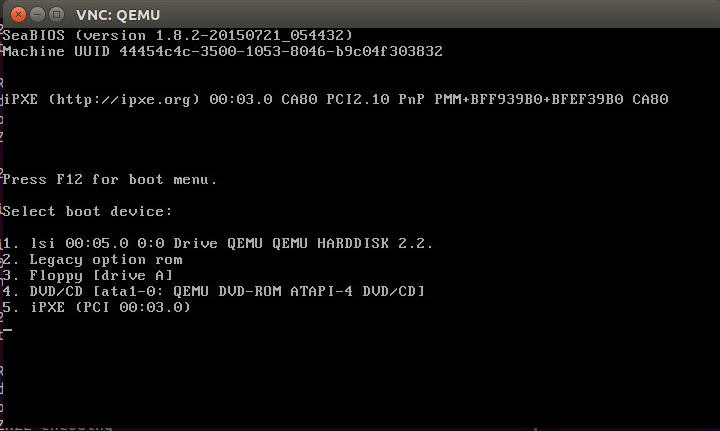
- Check virtual monitor output through VNC
In vagrant file, we port-forwarding guest VNC default port 5901 to host 15901. So, you can access VNC service via host 15901 port. You can see the virtual monitor is already running and listing boot devices of virtual node. Through this booting devices, you can deploy hypervisor or operating system into virtual compute node.
2.2. Deploy one virtual rack
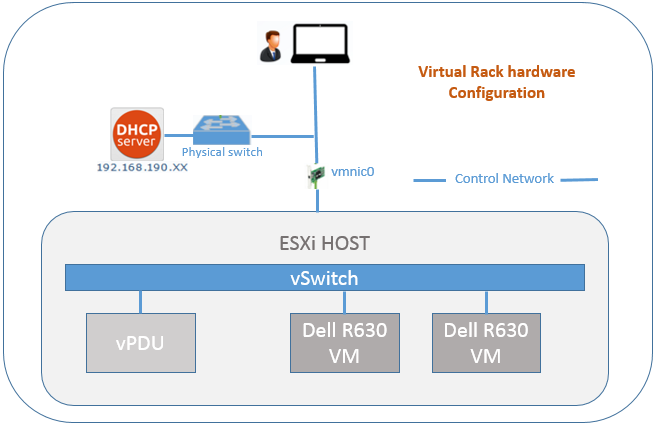
You can quickly deploy a virtual rack system including: 2x Dell_R630 and 1x vPDU inside VMWare ESXi.
Prerequisite
- Git clone tools repository
- You can access your VMWare ESXi server through network with username and password certified, and with all VMs cleared in this ESXi.
- Download DEll_R630 and vPDU OVA file under “tools/vrack_builder” directory. You can also build your own DELL_R630/vPDU file by refering here
- You can run this script on Ubuntu Linux distributions.(version > 12.04)
Install necessary Softwares
Install VMWare Python SDK
# sudo pip install pyvmomiInstall VMWare ovftool file
Download the VMWare OVF bundle, version 4.1.0 for Linux. Go to https://my.vmware.com/group/vmware/details?productId=491&downloadGroup=OVFTOOL410 (4.1.0 version, for Linux).
Install the OVF tool:
# sudo bash VMware-ovftool-4.1.0-2459827-lin.x86_64.bundle
Deploy the virtual rack
Deploy the virtual rack:
# cd tools/vrack_builder
# ./vrack_builder -u <esxi_username> -p <esxi_password> -h <esxi_ip>
Check virtual rack status
If the virtual rack deployed successfully, you will got the message:
"2 Dell R630, 1 vPDU deployed finished on ESXi"vPDU port mapping
Two Dell R630 vms will be mapped to vPDU port 1.1 and 1.2 respectively, the vPDU password is “123456” as default.
2.3. Play with InfraSIM
After virtual node, or a virtual rack is deployed, you can start to play with InfraSIM, either develop or validate your software on top of it.
Chassis management and hardware failure simulation. If the software application you’re working on has logic designed to deal with server enclosures, for example, discovering, cataloging and monitoring every server node and related chassis, below commands are able to manipulate all chassis properties and generating hardware failures through virtual BMC module:
Please play with InfraSIM IPMI_SIM data by accessing How to access vBMC data
- Virtual PDU functionality are able to setup and simulate one power distribution network so that software developers don’t have to pile up those physical PDUs, do cabling among server nodes, etc.
Please access vPDU Node and Control Section 3,4,5,6 for more information.
- Operating system and hypervisor installation. All these software could be easily deployed on top of these simulated server nodes.
InfraSIM supports using different booting device, optical disk, hard disk drive, network device to boot into and install many operating systems and hypervisors. Then software developer could start developing and validating their application without noticing they’re working with virtual hardware.