8. How Tos
8.1. VMWare Workstation deployment
The simulated hardware elements(vNode, vPDU, vSwitch) by InfraSIM can be deployed on VMWare workstation. Please follow below steps to setup InfraSIM in VMWare workstation.
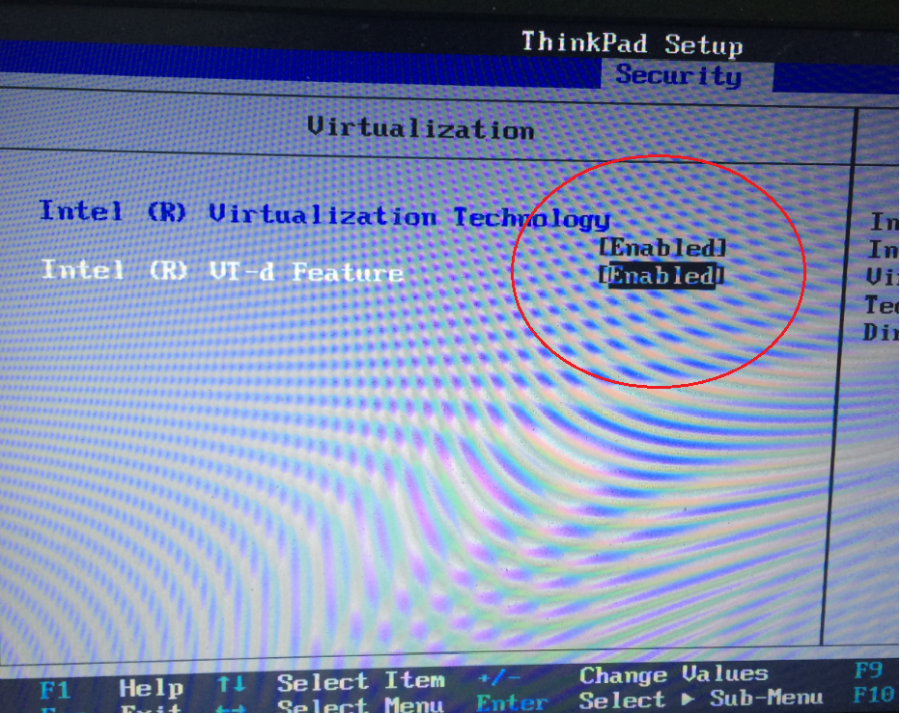
- Configure the BIOS to enable virtualization.
Download VMWare Workstation 11.0 from http://www.vmware.com/products/workstation/workstation-evaluation and install it. (The VMWare Workstation is not free)
- Configure a virtual network in the VMWare Workstation.
- From the Windows Start menu, open “Virtual Network Editor”.
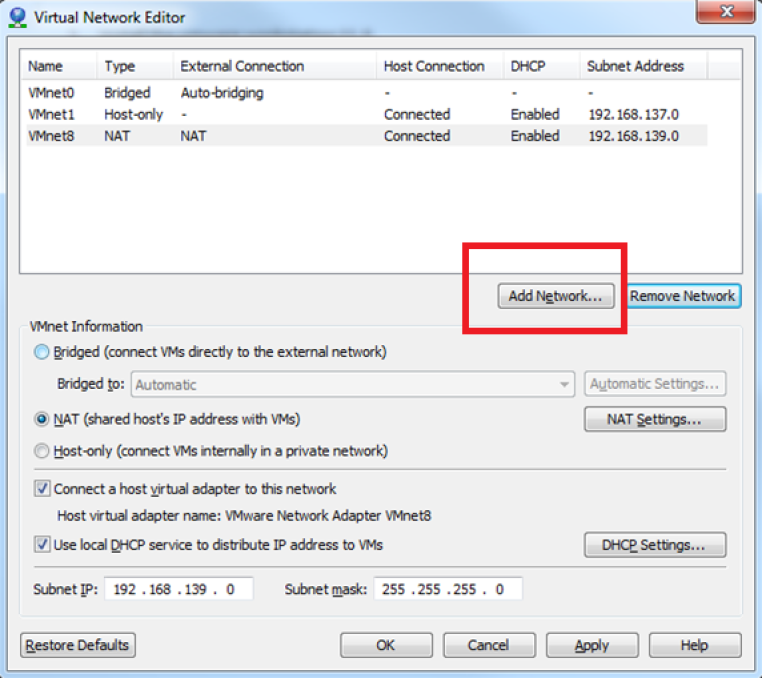
- Click “Add Network…” to add a new network VMnet2.

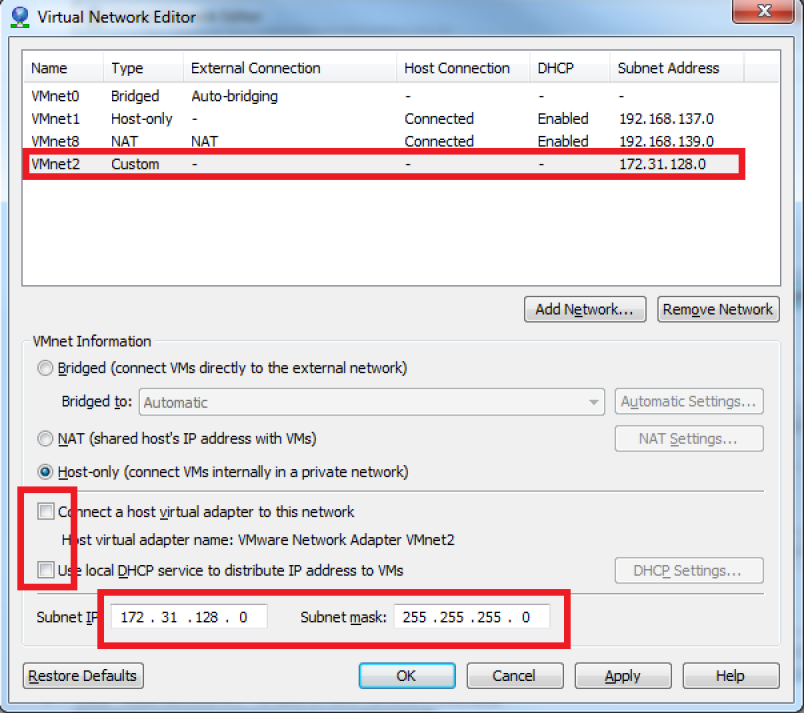
- Clear the “Connect a host virtual adapter to this network” check box and un-check the “Use local DHCP service to distribute IP address to VMs”, then set the Subnet IP to “172.31.128.0”, and the subnet mask to “255.255.255.0”.
- Import and configure InfraSIM OVA images.
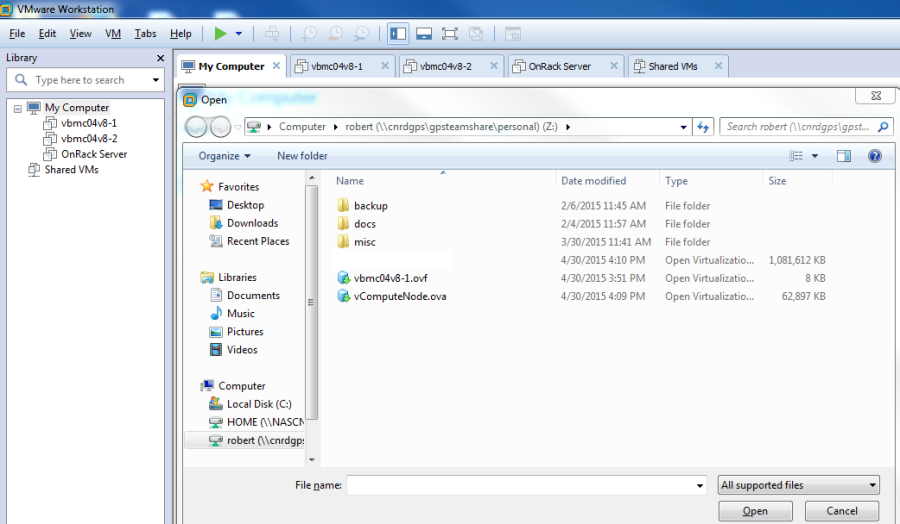
- Import the InfraSIM OVA image to the VMWare Workstation by “File -> Open…”, and then select the InfraSIM OVA image.
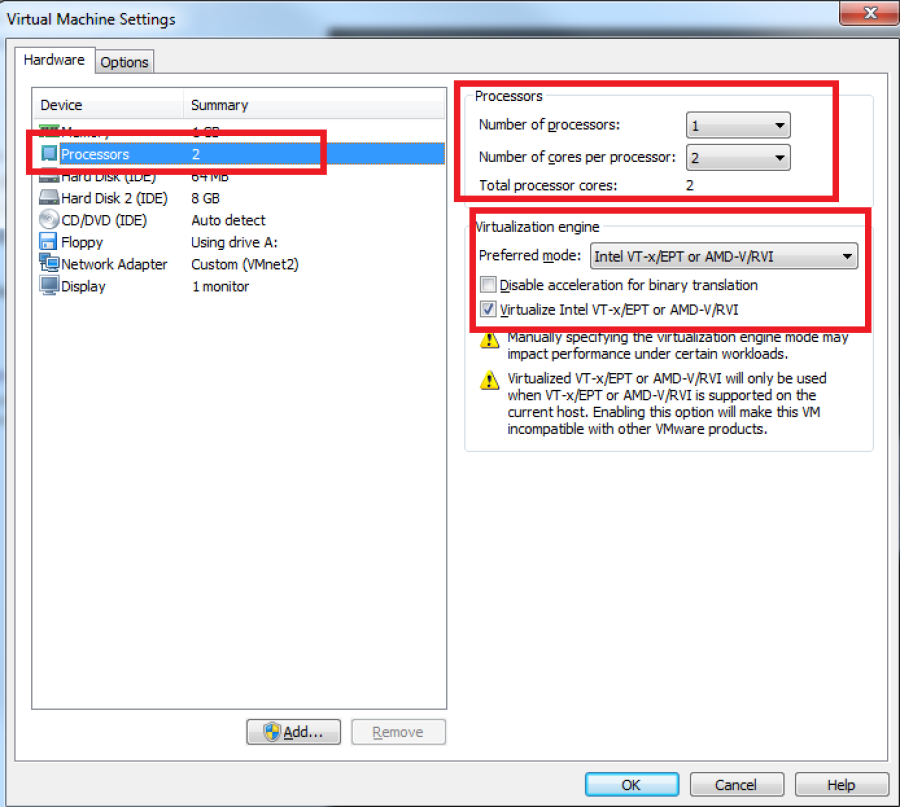
- After the InfraSIM OVA image imported successfully, open the virtual machine settings to enable the virtualization engine, and change the number of processor and number of cores per processor.
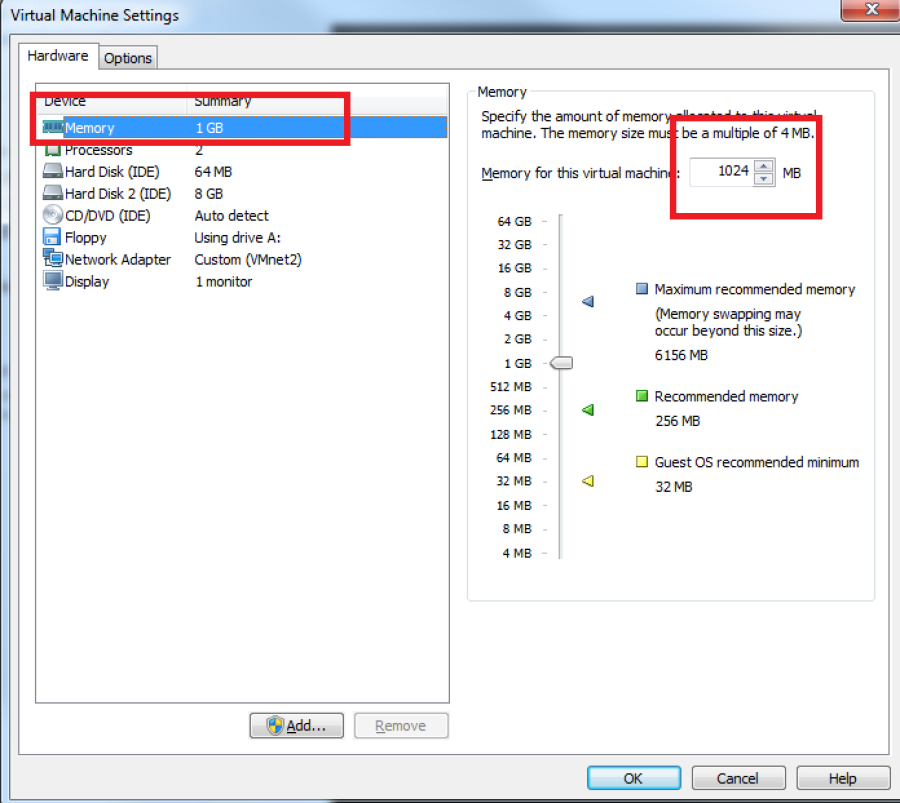
- Change the memory size to 1 GB.
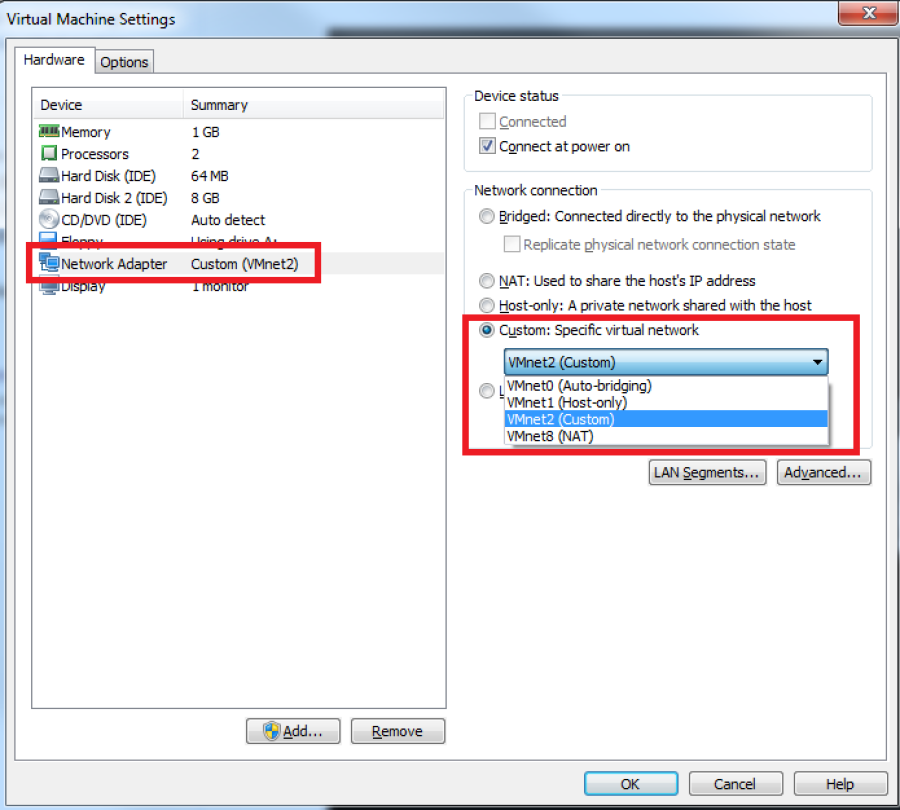
- Click Network Adapter, and connect the network adapter to “VMnet2” which was created in the previous step.
8.2. Build vNode and vPDU
InfarSIM build runs in a machine with Ubuntu 14.04 operating system.
Note: You can do the build in either physical machine or virtual machine. The build runs faster on a machine with more memory. It takes about 30 minutes on a machine with 2GB memory.
Note: If using virtual machine to do the build, ensure all source code is placed in own file system of that virtual machine. Because infraSIM build includes building Linux kernel and its filesystem out of source code, running build process inside virtual machine and placing source code in share folder in host machine would lead to mapping file related failure.
Before you begin the journey of infraSIM project first time, you should have the Ubuntu 14.04 installed first, and then have the following packages installed:
mkisofs autoconf pkg-config libtool nsis bison flex libncurses5 libncurses5-dev zlib1g-dev libglib2.0-dev libpopt-dev libssl-dev python-dev
Note: If you already cloned idic repository, then you can jump into the idic project and then run:
# sudo make setupenv
8.2.1. Build vNode
- Configure and build InfraSIM packages.
Option 1:
Get into the idic/vcompute/vnode, and then run:
# fakeroot make menuconfigThis command will pop up the configure interface for you to select and un-select packages as needed per your requirements, the configuration interface is as below:
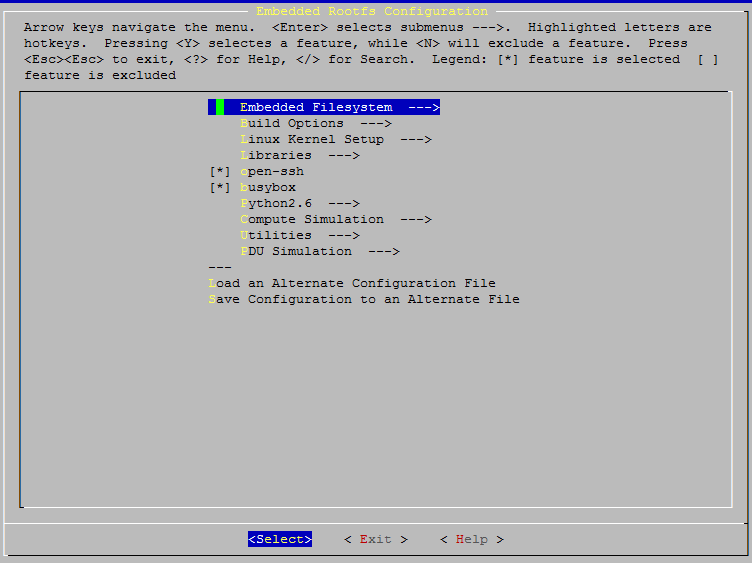
Note: All packages appeared could be configured to include or exclude from final build package. Every item in “make menuconfig” has help file and self-explanatory messages. There’s no need to do any adjustment, all default settings should work for building final packages. Unless you have particular requirement and fully understand how to adjust configurations.
Once you make the changes against the configuration, then you should save the configuration when exit the configure interface, and make the build:
# fakeroot makeOption 2:
If you are at the root directory of idic, you can configure and build the virtual node as below:
# fakeroot make menuconfig NODE=vnode
# fakeroot make vnode
When the build is complete, the rootfs package and binary will be at idic/pdk/linux/vnode which will including four files - config, System.map, vmlinuz and ramfs.lzma
- Add an utility or tool in InfraSIM
Default, there are few built-in utilities and tools in InfraSIM, you can add the utilities or tools as needed. As to how to add utility or tool to InfraSIM, you can following below steps:
- Prepare kconfig for the utility or tool to be added.
All the kconfig files are at idic/pdk/content/kconfigs, you can add a customized kconfig file, or add a sub configuration section in 19-utilities.kconfig. Regarding how to write kconfig, please reference linux document.
- Prepare a Makefile for your utility or tool for building and installing
All the Makefiles are at idic/pdk/content/mkfiles, you should add a new makefile for you packages, you can reference the other makefiles as an example when you write a new makefile.
- Prepare source code package or Debian package
All the source code packages or debian packages are placed at idic/pdk/content/packages. you can put the packages there if you already have. The other way is that you can download the packages in makefile when you build the packages.
- Prepare configuration file
You can follow the section Configure and build InfraSIM packages to re-configure and re-build the packages.
- Create virtual machine image
You can use the InfraSIM binaries and rootfs to build any type of virtual machine images or box images such as vagrant. Here we just take an example of how to use InfraSIM binaries and rootfs to build an OVA (open virtualization format). Before you create the ova image, you should have the following tools installed:
- ovftools
- extliux
- qemu
Then you can run the ova builder script to create the ova.
8.2.2. Build vPDU
The way of building virtual PDU is similar to virtual compute node. you can use the same way to configure and build the PDU.
- Build and configure vPDU
Option 1:
Go to idic/vpdu/sentry, and then run:
# fakeroot make menuconfig
# fakeroot make
Option 2:
If you are at the root directory of idic, run:
# fakeroot make menuconfig PDU=sentry
# fakeroot make sentry
Create image for vPDU
Please reference how to create virtual compute image for compute node.
8.3. Simulating another server
In infraSIM source code repository, there are one generic virtual node type (vnode) and several other server nodes (Dell, Quanta servers) simulation provided for end-user under idic/vcompute/vnode. InfraSIM also provided many utilities, interfaces for developers to build one simulation solution for a physical node that has not been supported by infraSIM This sections walk through all steps required to build one simulation for one specific server node.
Create a new directory for your node. If you want to create your own vNode, copy the full directory’s content from idic/vcompute/vnode under idic/vcompute directory:
$ git clone <idic-repo-url>
$ cd idic/vcompute
$ cp -rap vnode <your-vnode-name>
clone the tools repo for future use:
$ git clone <idic-repo-url>
After you create the directory, set your node name in Makefile:
$ cd <your-vnode-name>
Edit “Makefile” file, set “TARGETNAME = <your-vnode-name>” to your vnode name
Edit ”.config” file, set “CONFIG_HOSTNAME” to your vnode name
To simulate a real hardware server, you have to get the server fru’ data:
$ cd data
Under this directory, you can find “vnode.emu” file. In this file, we keep server fru’ data here, like:
$ mc_add_fru_data 0x20 0x0 0x100 data \
  0x01 0x00 0x01 0x04 0x0f 0x00 0x00 0xeb \
  0x01 0x03 0x17 0x00 0xcd 0x51 0x54 0x46 \
  0x43 0x4a 0x30 0x35 0x31 0x36 0x30 0x31 \
  ......
You can use ipmitool to get BMC sensor’s data:
$ ipmitool -U <your-account> -P <your-password> -I lanplus -H <your-BMC-IP> fru read <fru ID> fru.bin
call fru_gen.py script to dump fru.bin to hex format:
$ cp ../../tools/data_generater/fru_gen.py ./
$ python fru_gen.py fru.bin
fru_result will be generated, replace original fru data with the expected one in this file.
Same as fru, in “vnode.emu” file, we keep server sensors’ data here, like:
$ sensor_add 0x20 0x0 0x01 0x02 0x01
  main_sdr_add 0x20 \
  0x00 0x00 0x51 0x02 0x2a \
  0x20 0x00 0x01 0x15 0x01 0x67 0x40 0x09 0x6f 0x71 0x00 0x71 0x00 0x71 0x00 0xc0 \
  0x00 0x00 0x01 0x00 0x00 0x00 0x00 0x00 0x00 0x00 0xcf 0x50 0x77 0x72 0x20 0x55 \
  0x6e 0x69 0x74 0x20 0x53 0x74 0x61 0x74 0x75 0x73
$ sensor_set_value 0x20 0x0 0x01 0x0 0x1

You can use ipmitool to get BMC sensor's data::

$ ipmitool -U <your-account> -P <your-password> -I lanplus -H <your-BMC-IP> sdr dump sensors
The above command will dump your server BMC sensors’ data to the file named: “sensors” Generally, the sensor file contains binary data, we have to convert it to strings:
$ cp ../../tools/data_generater/sensors_gen.sh ./
$ ./sensor_gen.sh
After the command, you will get the file named: “all_sdr_sensors”:
Use "all_sdr_sensors" file content to replace "vnode.emu" file of all "sensor_add" sections
    **Notice: This step is not necessary for your node unless you want to emulate the real BMC sensors' data.**
SMBIOS data is also needed, which can be got by using the command:
$ dmidecode --dump-bin <your-vnode-name>_smbios.bin
Build your vnode with real hardware fru, sensors and smbios data.:
$ make <your-vnode-name>
Enjoy your customized node.
8.4. Simulating another vPDU
InfraSIM provided ServerTech and Panduit PDU simulation initially. InfraSIM also provided many utilities, interfaces for developers to build simulation solution for other physical PDUs. This sections walk through all steps required to build one simulation for other PDU infraSIM doesn’t support yet.
How to retrieve data from physical PDU
If you want to retrieve PDU MIB data, you should have snmpsim installed on your environment.Then run the following command to produce MIB snapshot for the PDU:
# snmprec.py --agent-udpv4-endpoint=<PDU IP address>; --start-oid=1.3.6 --output-file=/path/<target snmprec file>; --variation-module=sql --variation-module-options=dbtype:sqlite3,database:/path/<target pdu database file>,dbtable:snmprecFor more details of how to use snmprec.py, please go to section Producing SNMP snapshots at snmpsim home page for more help.
How to simulate physical PDU in InfraSIM
Once you retrieved data from physical PDU, the next step is to add a virtual PDU in InfraSIM for this physical server. The following steps will guide you how to do:
- Create a directory named PDU name at idic/vpdu
- Create a directory data at idic/vpdu/<PDU name>/data, and copy the data you get from physical server into data directory.
- Copy .config and Makefile into idic/vpdu/<PDU name>, and update target name in Makefile and .config
- Clone vpduserv, and implement the new pdu logic based on vendor’s PDU spec.
8.5. Write test case
This section introduces how to write test case in puffer.
Create a test script file
Test Case Name
The name of test case should follow the same format:
T\d+_[a-z0-9A-Z]+_[a-z0-9A-Z]+
- In puffer, test case name should:
Start with capital letter T and case id
Followed by the field type and short description about this case with underscores in the interval. Field types defined in class CBaseCase.
Note: The field type for InfraSIM is idic.
- For example, a test case named T123456_idic_CheckPowerStatus:
- T is short for test
- 123456 for case id
- idic for field type
- check the power status for the short description
Test Suite
You should put your test case scripts into <puffer_directory>/case/<test_suite>. Each folder under <puffer_directory>/case is a test suite. When you give the suite folder to puffer.py as a parameter, puffer will executes all test case scripts which in the folder, including subfolders.
Create case runtime data file
Case Runtime Data is used to maintain some specific data for different test objects. These data generally require the user to add and update manually.
The format of case runtime data defined in the json file which have same name and folder with case script. Please see the chapter Case Runtime Data .
Write test case
Import CBaseCase
Class CBaseCase defined in <puffer_directory>/case/CBaseCase.py, contains some member functions to help test case running:
from case.CBaseCase import *
Class Declaration
We declaration each case as subclass of class CBaseCase and the class name is case name. For example, if case name is T123456_idic_CheckPowerStatus, the class name should be same to it.
A test case maybe looks like:
from case.CBaseCase import *

class T000000_firmware_shortdescription(CBaseCase):

    def __init__(self):
        CBaseCase.__init__(self, self.__class__.__name__)

    def config(self):
        CBaseCase.config(self)

    def test(self):
        pass

    def deconfig(self):
        CBaseCase.deconfig(self)
And then, we need to override methods of class CBaseCase, such as config(), test() and deconfig().
Override config()
This method configuration system to expected status, configuration runtime HWIMO environment and stack environment.
The HWIMO configuration will set logger to save session log into log file and configuration SSH agent and stack configuration will build stack object, configuration stack ABS according to dict, build all nodes and power on.
However, in some case we want to enable some components we need to enable manually in configuration(). For example, if we want to use the ssh inside vbmc, we need enable the bmc_ssh in configuration():
def config(self):
    CBaseCase.config(self)
    self.enable_bmc_ssh()
Override test()
This method is the main part of the test.
You can:
- Use self.stack to get the stack which build in config().
- Use self.data[] to get case runtime data.
- Use self.monorail to use Monorail API.
- Use self.log() to log the information.
- Use self.result() to save the case result.
For example:
def test(self):
    #get racks from stack and get nodes from rack
    for obj_rack in self.stack.get_rack_list():
        for obj_node in obj_rack.get_node_list():

            #log the information
            self.log('INFO', 'Check node {} of rack {} ...'
                .format(obj_node.get_name(), obj_rack.get_name()))

            #get and match outlet power
            for power_unit in obj_node.power:
                pdu_pwd = power_unit[0].get_outlet_password(power_unit[1])
                power_unit[0].match_outlet_password(power_unit[1], pdu_pwd)

            #virtual node power control
            obj_node.power_on()

            #use case runtime data
            node_name = obj_node.get_name()
            node_lan_channel = self.data[node_name]

            #send command to virtual bmc through ssh
            obj_bmc = obj_node.get_bmc()
            bmc_ssh = obj_bmc.ssh
            ssh_rsp = bmc_ssh.send_command_wait_string(
                str_command = 'ipmitool -I lanplus -H localhost -U {} -P {} lan print {} {}'.format(obj_bmc.get_username(), obj_bmc.get_password(), node_lan_channel, chr(13)),
                wait = '$',
                int_time_out = 3,
                b_with_buff = False)

            #send command to virtual bmc through ipmitool
            ret, ipmi_rsp = obj_node.get_bmc().ipmi.ipmitool_standard_cmd('lan print')

            #if case failed
            if ret != 0:
                self.result(FAIL, 'FAIL_INFORMATION')
            else:
            #if no issue in this run, case pass.
                self.log('INFO', 'PASSED.')
Override deconfig()
This method deconfig system to expected status, reset REST and SSH sessions, deconfig stack and log handler:
def deconfig(self):
    self.log('INFO', 'Deconfig')
    CBaseCase.deconfig(self)