4. Getting started
This chapter describes how to access virtual server, virtual PDU and virtual infrastructure provided by InfraSIM.
4.1. Quick start of infrasim-compute application
4.1.1. Command interfaces
4.1.1.1. Initialize infrasim (you need to do it once)
sudo infrasim init
4.1.1.2. Start infrasim services
Start infrasim:
sudo infrasim node start
Verify your service by VNC and IPMI
Start IPMI Console:
sudo ipmi-console start
4.1.1.3. Status and version number check
sudo infrasim node status
sudo infrasim version
4.1.1.4. Stop infrasim services
Stop Infrasim Service:
sudo infrasim node stop
Stop IPMI Console:
sudo ipmi-console stop
4.1.2. Interface to access virtual server
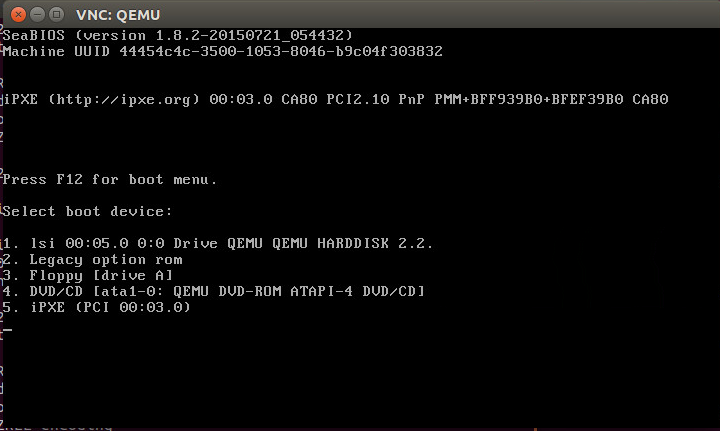
- Server graphic UI
VNC service is available through port 5901. You can see the virtual monitor is already running and listing boot devices of virtual node. Through this booting devices, you can deploy hypervisor or operating system into virtual compute node just like operating on one physical server
Virtual BMC
Install ipmitool on host machine.:
sudo apt-get install ipmitool
IPMI over LAN:
ipmitool -I lanplus -U admin -P admin -H <IP address> sdr list
Note
<IP address> is address of NIC assigned to BMC access in YAML configuration file
IPMI over internal path (vKCS) which requires OS and ipmitool application deployed inside virtual server:
ipmitool sdr list
You can get the command result like the following
        Pwr Unit Status  | Not Readable      | ns
        IPMI Watchdog    | Not Readable      | ns
        FP NMI Diag Int  | Not Readable      | ns
        SMI TimeOut      | Not Readable      | ns
        System Event Log | Not Readable      | ns
        System Event     | Not Readable      | ns
...
- Serial over LAN
It requires activate SoL through IPMI command and console running IPMI console will becomes serial console of virtual server. After InfraSIM services started, this command is to activate SoL:
sudo ipmitool -I lanplus -U admin -P admin -H localhost sol activate
[SOL Session operational.  Use ~? for help]
4.2. Setup an InfraSIM Virtual Server on ESXi
To setup an InfraSIM Server on ESXi, you should have an OVA with necessary environment prepared. You can consult the InfraSIM team to get the image or build one with the packer build image. Below are the steps to deploy and run InfraSIM on ESXi:
Get ESXi environment prepared by following instruction
Spin up a virtual machine by choosing “Deploy OVF Template”. Specify the URL of the OVA image.
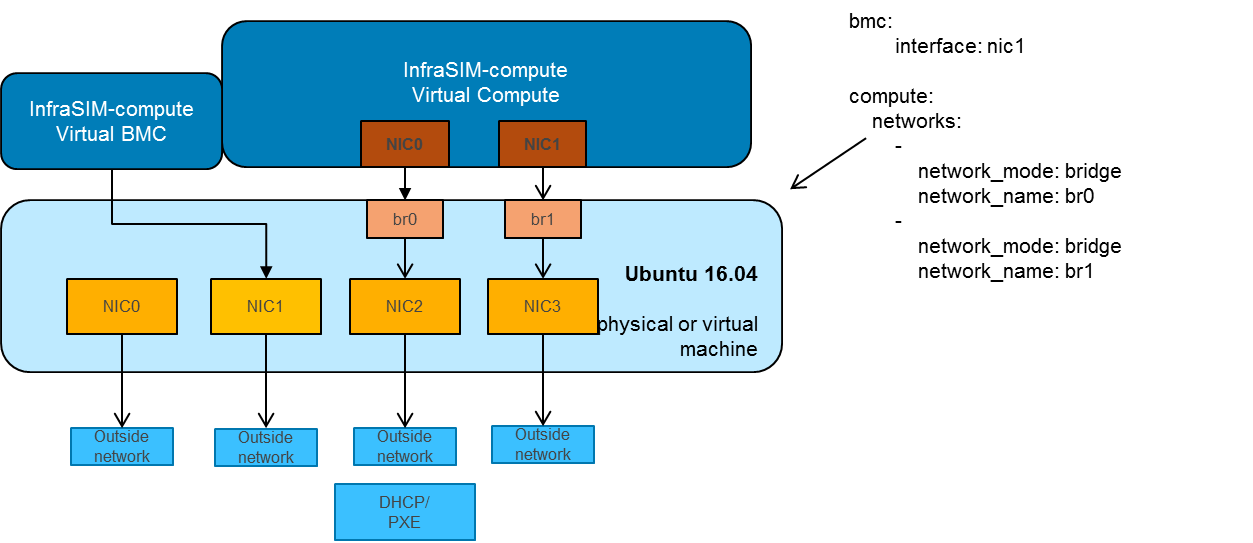
Map the networks used in the OVA. The networking configured inside OVA is multi-bridge mode:
Modify YAML configuration file as you need. The default configuration for OVA is infrasim.yml. The path is:
~/.infrasim/.node_map/.default.ymlKick off all InfraSIM services.
Done, enjoy this virtual server!
Note
No need to run infrasim-init because it’s already done during image build.
Configuration for OVA can be refered on Packer OVA Configuration. Below are the major parameters:
Disk Size: 40G
Memory: 8G
Number of CPUs: 2
Number of NICs: 4
Type of NICs: VMXNET 3
NIC0:
    Name: ens160
    networkName: ADMIN
NIC1:
    Name: ens192
    networkName: BMC
NIC2:
    Name: ens224
    networkName: CONTROL
    Promiscuous Mode: on
NIC3:
    Name: ens256
    networkName: DATA
    Promiscuous Mode: on
4.3. Setup an InfraSIM Virtual Server in VirtualBox
Virtualbox is available on multiple platforms. To get an InfraSIM BOX image, refer to packer build image
Install virtualbox on the host.
Create a directory for the VM and move the BOX image along with Vagrantfile under the directory.
CD to the directory and run commands:
vagrant box add --name infrasim-compute <YOUR_BOX_IMAGE>
vagrant up
vagrant ssh
Modify YML configuration if you need.
Start InfraSIM services. No “infrasim-init” needed.
BOX configuration can be refered on Packer BOX Configuration and Vagrantfile. The major parameters are:
Disk Size: 40G
Memory: 5G
Number of CPUs: 2
Number of NICs: 4
NIC0:
    Name: enp0s3
    Network Adapter: NAT
NIC1:
    Name: enp0s8
    Network Adapter: Internal Network
NIC2:
    Name: enp0s9
    Network Adapter: Internal Network
    Promiscuous Mode: on
NIC3:
    Name: enp0s10
    Network Adapter: Bridged Adapter
    Promiscuous Mode: on
4.4. Methodology for booting virtual nodes
There are generally three types of device for booting virtual nodes, which are network (pxe), disk and cdrom. We can modify the boot_order in YAML configuration file (The default configuration for OVA is default.yml, and the default path is ~/.infrasim/.node_map/default.yml) or send ipmitool command to choose the device for booting.
4.4.1. Booting from network
You can set the boot_order as n then start the node:
set the boot_order: n in the YAML configuration file
sudo infrasim node start
or send the ipmitool command after the node start like the following:
sudo infrasim node start
ipmitool -H 127.0.0.1 -U admin -P admin chassis bootdev pxe
ipmitool -H 127.0.0.1 -U admin -P admin chassis power off
ipmitool -H 127.0.0.1 -U admin -P admin chassis power on
4.4.2. Booting from disk
Here you need a disk image file for booting first. Then add this disk image file path as a parameter file in YAML configuration file like the following:
48     storage_backend:
49         #Set drive list and define drive attributes
50         -
51             controller:
52                 type: ahci
53                 max_drive_per_controller: 8
54                 drives:
55
56                 -
57                     #Set node disk size, the unit is GB.
58                     #The default value is 8GB
59                     #
60                     size: 8
61                     # Add the disk image file path here
62                     file: [disk image file path]
Then set the boot_order as c then start the node:
set the boot_order: c in the YAML configuration file
sudo infrasim node start
or send the ipmitool command after the node start like the following:
sudo infrasim node start
ipmitool -H 127.0.0.1 -U admin -P admin chassis bootdev disk
ipmitool -H 127.0.0.1 -U admin -P admin chassis power off
ipmitool -H 127.0.0.1 -U admin -P admin chassis power on
4.4.3. Booting from cdrom
There are two ways to boot from cdrom. Both need to add the iso file path in the YAML configuration file to give the iso file to qemu. The default configuration for OVA is default.yml and the default path is ~/.infrasim/.node_map/default.yml. The first one is giving the iso file to qemu directly, that is, an iso file is needed. The second one is directly bind cdrom device file, which requires you to provide a bootable media on the platform hosting infrasim.
Steps for the first way
Here you need an iso file for booting first and add this iso file path in YAML configuration file. You can add the parameter
cdromin the YAML configuration file like the following:73 network_mode: bridge 74 network_name: br1 75 device: e1000 76 # Add the iso file path here 77 cdrom: [iso file path] 78 bmc: 79 interface: ens192
Steps for the second way
You need to insert a bootable cdrom. Do it on a physical machine, or if you host infrasim on a virtual machine, edit VM setting.
Give VM setting on vSphere for example:
a. Choose “edit settings” to enter the “Virtual Machine Properties” page;
b. Click on “CD/DVD drive1”;
c. Browse and choose an ISO file in “Datastore ISO File”;
d. As for the “Device Status”, check “Connected” and “Connect at power on”;
e. Click on “OK” to save the change.
Modify the YAML configuration file:
73             network_mode: bridge
74             network_name: br1
75             device: e1000
76      # Add the iso file path here
77      cdrom: /dev/sr0
78 bmc:
79     interface: ens192
After either way, set the boot_order as d then start the node:
set the boot_order: d in the YAML configuration file
sudo infrasim node start
or send the ipmitool command after the node start like the following:
sudo infrasim node start
ipmitool -H 127.0.0.1 -U admin -P admin chassis bootdev cdrom
ipmitool -H 127.0.0.1 -U admin -P admin chassis power off
ipmitool -H 127.0.0.1 -U admin -P admin chassis power on
4.5. Relationship table of Infrasim command and standard server command
Here we list a table to reflect the operations on physical server and the corresponding InfraSIM command. Note that the InfraSIM command with (*) here is not the CLI command. Use “infrasim -h” can get the help message.
standard server command InfraSIM command AC power on a-node infrasim node start a-node AC power off a-node infrasim node stop a-node dismiss server node a-node infrasim node destroy a-node reset a-node infrasim node restart a-node Check server a-node specification infrasim node info a-node Check server a-node running status infrasim node status a-node (If you see “a-node-bmc is running”, it indicates AC is on, bmc is alive. If you see “a-node-node is running”, it indicates the compute node is powered on) KVM - virtual keyboard, visual monitor Connecting to InfraSIM with VNC client(*) configuration update for a-node (node type, nic, processor, drive, memory)
- update a-node yaml file(*)
- infrasim config update a-node [a-node yaml file path]
- infrasim node stop a-node
- infrasim node destroy a-node
- infrasim node start a-node
add new server node b-node
- compose b-node yaml file(*)
- infrasim config add b-node [b-node yaml file path]
- infrasim node start b-node
- infrasim config list